Earnshaw’s Theorem states that “a collection of point charges cannot be maintained in a stable stationary equilibrium solely by electromagnetic interaction of the charges.” In other words, no arrangement of permanent magnets, no matter what their polarity, strength, or arrangement, can result in magnetic levitation (unless tricks like gyroscopic stabilization, geometric restriction along one axis, and/or closed-loop electronic control are used.)
Earnshaw was a spoilsport!
Fortunately, it turns out that there’s a loophole — diamagnetism. Certain materials repel all magnetic fields (albeit very weakly), and this effect can indeed be used to produce continuous magnetic levitation, with no electronics or power sources needed.
Bismuth is generally used for experiments like this. It’s one of the most diamagnetic materials around, fairly easily worked (it melts at 271 degrees C, which can be achieved over a kitchen stove), and is nontoxic enough that it’s the active ingredient in Pepto-Bismol. At about $70/kg on eBay, it’s not dirt-cheap, but neither is it as expensive as gold or platinum, so it’s within reach of most amateur scientists. With the proper setup, the diamagnetic properties of bismuth can be used to make magnets levitate — permanently — with no power supply or PID controller in sight.
Having seen an interesting article online on how to make diamagnetic levitation work, I bought a pound (about 450g) of fairly pure bismuth on eBay and stopped by Lowe’s and Radio Shack for a few parts I didn’t have. (I really need to get a house, where I can have a properly-equipped lab. Not having bismuth is understandable, but not having ring magnets or 10-24 threaded rod stock on hand is embarrassing.) Here’s what’s needed for the levitation project:
- About 300g of fairly pure bismuth metal (the chunk I bought was claimed to be 99% pure, and worked fine);
- A small, lightweight neodymium magnet. (I used one of the “small discs” in a neodymium magnet set from ThinkGeek);
- Several ceramic ring magnets (I used two 5-packs from Radio Shack);
- A length (maybe 30cm or so) of 10-24 threaded rod;
- Two hex nuts, three washers, and a wing nut for the threaded rod;
- A project box or other enclosure (to hold the ring magnets over the bismuth);
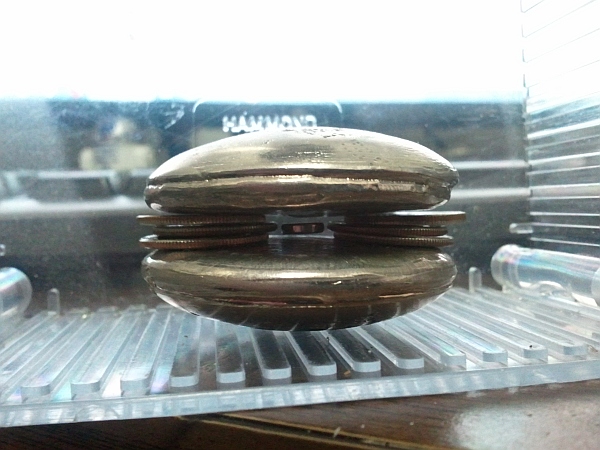
- Something to hold the bismuth discs apart (I used two stacks of three dimes each).
- Three clean, empty aluminum cans
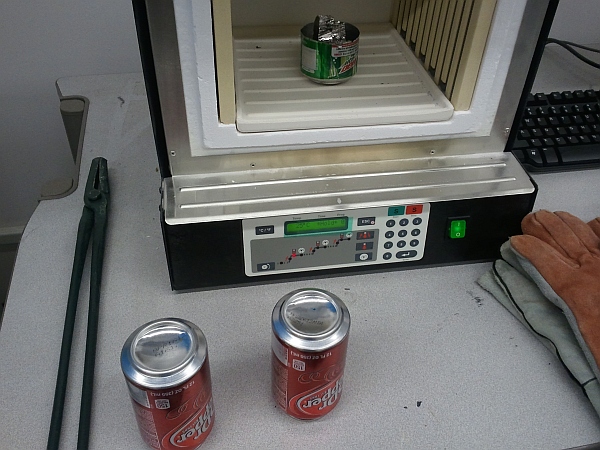
- A furnace capable of 300 degrees C or so. (Bismuth melts at about 271.5 degrees C, but I found that using 450C made it melt more easily. Aluminum is good up to 660 degrees C, so stay well below that. You can use a kitchen stovetop if you don’t have a furnace available.)
- Metalworking tongs, if using a furnace.
- A milling machine, or at least a file / Dremel tool / sandpaper, to flatten out the cast bismuth discs.
First, prepare two empty aluminum cans; remove the pop-tops and turn them upside-down. (The molten bismuth will be poured into the indentations.)
Next, cut the bottom part of the third can off (leave about half to 2/3 of the can attached to the bottom; you’ll use this as the crucible.)
Place the bismuth ingot in the can bottom and use the furnace to heat it until it’s nicely melted. (Unlike most things except water, solid bismuth is less dense than the liquid, and should float, so it should be easy to see when it has all melted.)
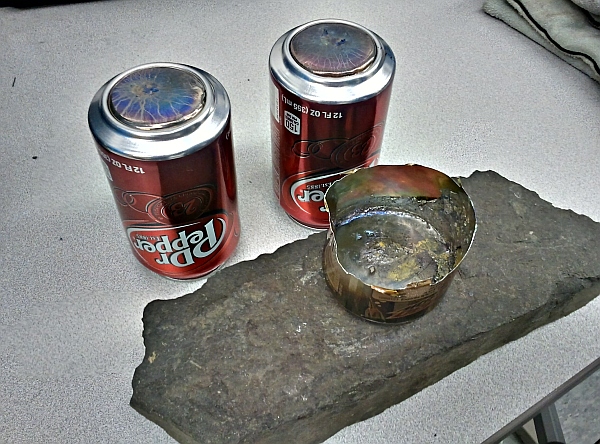
Using the tongs, carefully remove the can from the furnace and pour the molten bismuth into the indentations in the two other aluminum cans. Allow them to cool (make sure to set the can crucible on a heatproof surface while it cools, as well.)
Once the bismuth and cans have cooled to room temperature, pry the bismuth out. Bismuth is brittle, so take care not to chip it too badly. (I found it necessary to cut the cans apart and tear them open enough to release the bismuth.)
Mill, sand, file, or otherwise flatten the discs, without making them too thin. They will work better to repel the magnetic field if they are flat. The ones I made initially had a peak near the center that had to be flattened out with a Dremel tool. I plan to mill them flat next week.)
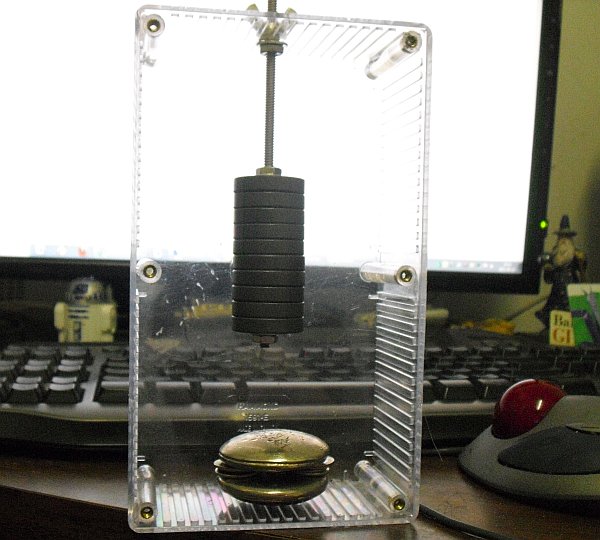
Next, it’s time to assemble the project. Here’s an overview picture, to give an idea of what you’re making:
Thread the ring magnets onto the threaded rod, and secure them with hex nuts and washers at each end. They should go nearly at one end of the rod, leaving just enough rod left over to ensure that the nut doesn’t come off. (This isn’t very critical; you can leave a few mm and still have it work fine.)
Thread another hex nut, then a washer, onto the rod from the top. Lower these to near where the magnets are. Cut a hole in the top of the box or enclosure large enough for the rod. Using the wing nut and another washer, suspend the rod about 20cm above the bottom of the box.
At this point, take the small neodymium magnet and note which side is attracted to the end of the magnet rod; this end will need to point upwards. (Try not to let it jump onto the rod; neodymium discs are brittle.)
Place one bismuth disc, flattest side up, in the bottom of the box, centered under the magnet stack. Place the dimes or other spacers around the edges of the disc, leaving enough room in the center for the disc magnet to float freely.
Place the neodymium magnet onto the bismuth disc. Carefully lower the second bismuth disc, flattest side down, onto the spacers.
Now to adjust it. At this point, the magnet should be resting on the bottom bismuth disc (gravity pulling it downwards with more force than the magnetic force from the ring magnets plus the diamagnetic repulsion from the bottom disc are exerting upwards.) Very gently, start rotating the threaded rod to slowly lower the magnet stack towards the bismuth discs. You should see the disc magnet start to “dance” around a bit, then lift up on one end, then eventually leave the bottom disc altogether and float in the air. If you overdo it, or if the bismuth discs are too far apart, the disc may skip the “floating” phase and bump into the top disc. If this is the case, back off on the magnets a bit to get the disc to float lower. If you can’t find a setting where the disc floats, decrease the distance between the bismuth plates.
Here’s a video of the completed project doing its thing, even while being subjected to gentle puffs of compressed air and being poked at with a (nonmagnetic!) stick…
Have fun! Send me an email (“eric” at this domain) if you have questions.


Keep up the great work.Thanks for posting this informative article.
Keep up the great work.Thanks for posting this informative article.